Soft Sculpture And Stuffies

A site to talk about my soft sculpture and stuffed toy creations, paper doll artwork and tarot card art in progress. All are creative endeavors for selling at Medieval events.

Name:
Location: Milwaukee, Wisconsin, United States

I'm a science fiction fan from wayback, artist, soft sculpture toy designer and cat owner.

Thursday, July 31, 2014

Anglo Saxon Otter Paper Doll

Excuse me --- Paper CUT OUT.  Guys don't buy paper dolls but they WILL buy paper cut outs!  Marketing ploy here, LOL


This one was done primarily because of the Medieval SCA event Pennsic War, a lot of people there love otters so I put together one here with a complete fighting outfit based on one of the historical finds done in the UK.  It was a one page deal, and came with text about each of the items to be worn.  Sort of educational.
 
What was funny was that when I took this down to Office Depot to be run off on light gray card stock, two businessmen there waiting for their print job to finish were hunched over reading my stuff on the counter while I was looking through receipt books one aisle over.  They seemed mesmerized by it! 
 
The border on this is one of the Microsoft Word borders offered, which fancies things up. I played around with the width on it to get something substantial.  The points seemed to be best to represent armor.

Monday, July 28, 2014

Egyptian Paper Doll


Almost forgot to post the first page of the paper doll BAST today. I wanted to get that up a few days ago but missed the link.
                                
This was a 2 page set with more outfits on the second page, little hieroglyphic cats at the bottom and all the designs based on the real historical ones taken from books showing wall art in the tombs.  It was a really fun drawing project for me.  The three little mouse toy juggling cats at the bottom were the three cats we owned at the time - Dax, Merlin and Hudson.

Mouse Butt - Feedback

Well, according to what I saw at the cat show event yesterday, they're a hit.  The mouse butt cat toys outsold even the hamsters on the table.  Though it wasn't a huge sales event, due to rain outside, there were enough people there that responded well to the new toy.  All I had to do was hold one up by the tail, let it spin in the air and say 'this is our new item, Mouse Butt' and everyone's face lit up.
 
Guess it's a 'keeper'.  I used the rat tail cording for the tail, and a very soft (silky even) fake fur in chocolate brown. 
 

Sunday, July 27, 2014

Furry Slinkys -- Ferrets


Here's the standing ferrets I used to make. It's almost impossible to get the brown and white fake fur anymore so I stopped doing them.  At this point I think I'd modify the heads quite a bit more.  They were a simple pattern and after doing a number of them I started adding jester and clown outfits to the ones I was doing, just to spice things up a bit. 
 
They did sell well at the ferret events.

Friday, July 25, 2014

My BEST Selling Paper Doll Set


Back when I was working at Milwaukee Insurance I did some sketches on scratch paper that ended up as the Hamsters Of Doom.  I sent a copy to a friend who asked where the rest of the costumes were, so I had to make a second page worth of outfits for the two. 
 
Over the years I've sold more of this one than any of the others.  It was fun to draw and the first of about 14 different sets that I ended up doing (all of them are animal related).  Between the printing cost and the sales, I think I actually only ever broke even on them, but who cares.  They were all fun to do. 

Tuesday, July 22, 2014

Mouse Butt!

I've been racking my brains trying to come up with something new as a cat toy, especially for next Sunday's feline rescue event.  I have a booth space there and will bring the standard stuff but wanted a new item, something fun.
 
Well, I had half a yard of really soft fake fur, the type that feels real, and it was in brown.  I cut out half circles, sewed them with 'tails' on and stuffed them with fiberfill and catnip.  They're 'Mouse Butts'.  I know the cats will like them, Rudy already tried to steal four of them from my pile.
 
Sure, it's dorky and maybe a little 'gross' for the laid back crowd, but as most cat owners know, their kitties like to present presents every so often and some of those don't come in complete form.  Let's just say I'm 'emulating nature'.  LOL

Sunday, July 20, 2014

Dalmatian Dog Stuffie

Here's the Dalmatian dog I made out of polar fleece and black velour.  I loved how he turned out but again it was a 'life size' dog, over three feet long and took more stuffing than I wanted. 
 
I freeform cut the pattern, did hand sculpting on the face/muzzle, made a really 'doggy' shaped nose with nostrils, and I think I sold him for the ridiculous price of $35.  Kills me now to realize I could have gotten three times that amount.  Ah well.  I've always underpriced my stuff.

Friday, July 18, 2014

Deadlines.....

Nothing like waiting till the very last minute to do something.  This week has been busy with everything BUT sewing, and I had someone stopping by today around 5:30 to pick up merchandise for the Ren Faire - Which meant I had a marathon 7 hour sewing project to do if I wanted things done in time for their arrival. 
 
It all did manage to get completed (and they ordered other items for pickup next Friday) so I was happy.  I was even happier about the check I got for the bats and baby griffens too, of course.  Eight fruit bats in two colors (brown and black), one Cthulhu doll, 10 catnip mice and 10 baby griffens. 
 
What's been selling fast are the 'dead birds', I had some catnip toy sparrows and parakeets that had X's for eyes and they put them out in a bowl with a sign saying they were deceased, and the entire batch sold quickly.  I'll try making more than just the sparrows and keets, maybe chickadees, or canaries.

Wednesday, July 16, 2014

Sometimes I Worked Big

 
This is my Cheetah, the body was about 3 feet long, with a 3 foot long tail. The fabric was black and white velours (belly, ears, muzzle marking and white chest) and a spotted print poly/cotton fabric.  I had the haunches go up high, could have thinned down the chest and belly, but overall I did like how it turned out, at the time, given my creature making skills at that point (around 1997).  I had to have one of those foot long doll needles to sculpt the face.  The eyes were safety lock style, about 28mm in size.
 
It's so sad, I used a LOT of stuffing on it, and ended up putting a $25 price tag on it!  It sold at Pennsic.  Ahh well, I do have a few pictures of it yet.  Lets me remember some of the one-shots.

Tuesday, July 15, 2014

Hot Buttered Popcorn

 
Wow, talk about not being able to downsize a picture!!!!  I tried! I really did.  The link won't let me do a reduction.
 
Ok, this below here is hot buttered popcorn - a catnip toy I did after seeing some popcorn done on the felt food sites.  They were easy, however they took a while to do, so making up 18 bags with 10 pieces each, that's 180 individual pieces. It took me two entire evenings.  ARGH!
 
I snagged a picture off Google, did up the tag, covered it with clear contact paper, stapled the tag to the zip lock baggie, and away we go.  The pieces are made with white felt cut in wavy edged circles. I did a running stitch around the bottom, stuffed in a little stuffing and some catnip, pulled it tight, stuck in an orange piece of felt for the kernel, and I also added one 'black' kernel in with each bag since you can never have popcorn without some burnt pieces in there somewhere.  Each popcorn kernel is about an inch across when done.  The wavy circles were about 3" across when I cut them out.
 
These were donated as raffle prizes for an animal seminar/movie night.  I did bags of 7 each for selling at the PurrTosa store as well.  It was an interesting experiment, but they take so darn long to do I don't think this is a regular item for me. 

Saturday, July 12, 2014

Hanging Bats

One of the best 'bat' soft sculptures that sells is also the very simplest one to make.  They can be sized from vampire (4") up to fruit bat (18") long, and all look good.  I use fake fur, the short napped type most commonly called 'craft fur', and felt or polar fleece  for the wings.
 
The body is a long teardrop shape, which I leave open at the 'foot' end. Sew, turn, stuff it.
 
Head is a triangle shape - sew all the way around, carefully slice the back and turn, then put on the safety lock eyes, and stuff it. I used to use brown 'bear' eyes for these, but they look more distinctive with yellow eyes with round pupils. 
 
Cut 2 pairs of triangles out of felt, sew 2 layers together in a V shape, leaving the bottom side open.  Sew to the head.  Then sew the head to the round part of the body. 
 
For the feet I sew a long, rounded tube of fabric, sort of a long U shape.  I cut a length of wire, loop the ends so nothing sharp is sticking out, fold the wire in half and insert it into the fabric tube.  Take 2 stitches at the top center to keep the wire in place, stick the open flat end of the tube down into the foot section of the body and sew that by hand.  Bend the wire to bring the top down towards the body a bit, this allows the feet to be set over a curtain rod or other item and hang on it's own.
 
Wings don't need to be large, just big enough to wrap loosely around half the body.  On the small bats I only make them 4" long. On the big fruit bats they're 12 inches long. They only get one finger vein, since two generally won't show.  The wings are attached at the back of the bat and I bring the tips around to the front and do a few stitches to hold the tips together right under where the foot starts. This makes them look like they're hanging with folded wings.
 
You can fancy them up by using polar fleece only on the inside of the wings and use a black on black silk style brocade for the outside of the wings (that stuff frays, so give yourself enough seam allowance and tuck the bottom under when you attach the wings by hand on the back).
 
If you tilt the head a bit to one side they get a quizzical look to them. And with the fruit bats, when you turn them over right side up they look positively demented!

Wednesday, July 09, 2014

Books For Cats - Simple Catnip Toy

One thing I made that I've never seen anyone else do yet is a line of "Books For Cats".  I took a piece of printed fabric about 8 x 4" in size for the outside, and a solid color fabric for the inside, with the same dimensions.  On printer paper I did up a title, and 4 lines of 'text' for the inside.  Clear contact paper goes over that to keep the ink from running.  Cut the strips with the words out and lay the title on the front, with a section of organza ribbon 1" wide that's sheer enough to see through over the top of it, and sew that down on all 4 sides (tuck the cut ends under).
 
On the inside piece you'll lay out the text strips, putting ribbon over those too (I do it on the diagonal for visual interest) and sew them down.  Sew the front to the inside piece, turn, push in some catnip, then close the end.  Fold in half and sew a 'book binding' down the back spine.  Open it up and it's a 'book'. 
 
You can do anything as a story that's really short.  I did one series of books with that orange Halloween fabric with the jumping black cat and called it Fleas. In side it said "I do NOT have fleas. I gave them all to the dog".  You can be as creative as you want with them.  The cats love the catnip and will open it and look like they're reading, as they slobber over the whole thing.
 
I've done little books about milk, hamsters, bunnies in the back yard, chickadees on the bird feeder, yowling at the moon and a whole slew of other subjects.  Try to match the cover fabric to the theme of the book, too.

Monday, July 07, 2014

Pigs In A Blanket & Chocolate Eclairs

Looking through the 'felt food' images online I did give a try to making catnip filled fake eclairs, which turned out pretty good actually (though I squared the corners too much, they look like chocolate covered long john donuts instead) and tried pigs in a blanket which I was not so happy with.  The wrap around 'dough' has to be longer.  I can't go with what size it would normally be in real life, it just didn't work.
 
Here's a picture that I worked from with the eclairs. (The picture isn't from my stuff).
                                      
And here's a picture that I used as a basis for the pigs in a blanket.  (This picture also is not from my stuff, it's just what I was working  from.     
                        
                                        Pickle Things Felt Play Food - Pigs in a Blanket with Tater Tots
I was using polar fleece in tan for the éclair and for the dough wrap around the hot dogs.  Chocolate colored felt was the frosting on the first, and I found a fabric that had the right color for the hot dogs in with summer seersucker fabric at the store.

Saturday, July 05, 2014

Broccoli and Cauliflower

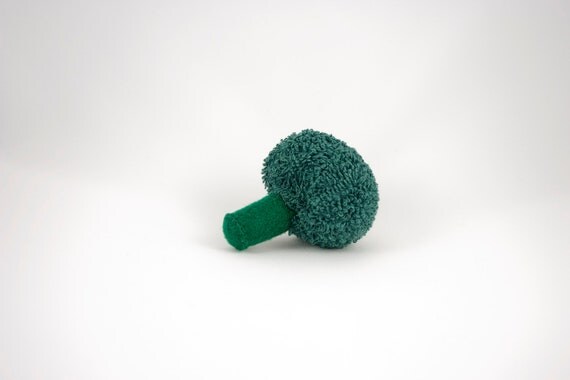
I check through the 'images' section on google for 'felt food' to get ideas for new cat toys.  What struck me lately was the simple Broccoli pattern that also would work for Cauliflower as well.  Not the whole head of broccoli, just florets. 
 
The pictures (one is shown below) look like the people used a green terrycloth for the top, with green felt rolled into a thick stem.  I chose a fuzzier green fabric and gave it a try the other day.  Basically I got the darkest green they had, cut  a 4" circle,  gathered, stuffed and pushed in a 1 1/2" x 3" piece of lighter green felt rolled up tight for the stem into the bottom.  It turned out looking pretty good. 


Here's a picture of the one I found over on Etsy.com.  They added a small circle at the bottom of the stem, I didn't. 

They turned out pretty nice looking.  The same pattern for cauliflower didn't look as nice though. 

Friday, July 04, 2014

When The Hobby Starts Getting Serious

 
I remember how 'scary' it was when I bought my first complete bolt of fabric from the fabric store.  That seemed like such a huge outlay of money.  Pfft!  NOW it's nothing to drop $40 at a time on fabric.  No more getting 1/4 yard pieces or 1/2 yard pieces.  The employees soon get to know your name, you are in the store so often. (Post office clerks get to know you too, from all the packages you send out).
 
You switch over to 'bulk' once you figure out how much of each item you use.  I used to buy the 14 gauge electrical wire that I use for wiring wings at the hardware store by the foot, but after getting 70 feet one time, I ended up just buying the entire 500 foot roll.  Been doing that ever since.
 
And thread!  I kept all the empty spools one year just to see how much I was going through.  The box had 75 empty spools in by December. That's when I switched over to cone thread.  I didn't have the stand to put them on so they'd feed into the sewing machine right, but that was easy to fix.  I used a coffee mug to hold the cone, took some wire and wrapped it around the top of my sewing machine to make a thread guide, and that worked really well.  Then someone bought me one of those plastic holders with the bent wire top on it for me and I've used that since.
 
A REALLY GOOD purchase was one of those wooden spool racks.  I had one for the smaller spools (it hangs on the wall or stands up on it's own).  They make them for the cone thread too.
 
And when your 'craft room' spills out into your kitchen and living room......well you probably are really serious about sewing!


Thursday, July 03, 2014

Please Make A Comment Anytime You Want To Know Something

I'm wondering if anyone has any questions about anything on my blog here, either about technique, about supplies cost, about where to find something, or about making items.  Feel free to ask.

Making Real Looking Birds

Well, insofar as fabric makes it possible that is.  Here's my Cockatiel.  He was made of grey velour, but gray felt actually gives a crisper look.  His feet felt and are wired inside with the 14 gauge electrical wire I use, and there's a stiffener piece of plastic down the tail.
The body is done first, then the tail applied, then the wings go over the tail to cover any attaching stitching. This is all done by hand.  I machine appliqued the white marks on the wings with white felt.  His crest was put on BEFORE the yellow face circle was.  The beak is then sewn on and the eyes next - which are 6mm black beads but now I think I'd use 8mm.  Then the orange cheek spots.  The bottom of the wings have 'feather' lines sewn on by the sewing machine, I used black thread so they would show up.
Here's the frontal view. Both cheek spots are the same color, not sure why one looks duller than the other side.  There are seed beads put on as nostrils, you can barely see them here, but they're there.   I think he turned out pretty nice.  If I redid him I think I'd use felt for the wings and body instead, it lays a little smoother.

Wednesday, July 02, 2014

Saving Your Fingers

If you do as much hand sewing as I do you'll eventually wear the surface of several fingers down so thin that you actually do some damage.  I assemble so many small items b y hand I end up losing my fingerprints on two fingers, have a rubbed area over my third finger where the thread rubs, and have stuck myself numerous times with the needle and drawn blood.

Get that tetanus shot every 10 years, just 'in case'.  You're being pierced by metal.  A needle has a surface coating on it but over time your fingers are going to be wearing that off and the end can transfer something into your blood supply. 

For the rubbed areas I get something called 'moleskin' or 'safety tape' from any store that carries bandages and health supplies. The stuff is on a roll, is like very thick tape, and comes off easily when you need to remove it from your fingers.  It has saved my skin from cracking across the knuckle area and is worth having around for those tough jobs that HAVE to be done by a certain deadline. 

For your fingers that are being worn down through two layers of skin I use something that came on the market about three years ago. It's in the bandage section too, and is a fluid.  The brand name is Liquid Bandage. It was designed for putting over blisters on the feet (basically done because of runners and hikers) but works great on the hand issues.  It stinks like fingernail polish and may sting at first, but once dry it gives a protective layering similar to superglue.  It will flake off naturally in 24 to 36 hours and does a great job of protecting an area.  You can use it on cuts as well, but NOT on large areas such as scrapes or burns.  I love the stuff, it works as intended.

Tuesday, July 01, 2014

Selling At An Event

 
There are a few things I've learned from selling at large and small events. The big thing is that there is a 'blind spot' on the table or in the selling tent, no matter which event you go to.  One particular area is always going to be passed over by people.
 
At the small events people go by in one direction, with the flow of the crowd, so usually what's on the end they first come up to is what's passed over quickly, they tend to focus on the middle and far end of the table. I'm not sure why, unless it's to not block the person behind them, yet not feel like they're being pushed past.  I counter this by putting something either flashily colored on the end there to draw their attention, or I use a vertical display that makes them pause and look.  It gives that needed 2 second reassessment in the customer.
 
In a tent, like the setup we had at Pennsic War (Renaissance Faire event) it was always extremely obvious where people were ignoring things.  We were always set up on grass. A look at the grass on day 3 of the 11 day event would always show WHERE the grass was still fresh and vibrant, and which areas were well on their way to being worn down to bare dirt. 
 
Our table with the catnip toys ALWAYS had the first worn down spot appear. In fact people actually wore a hollow area there in front of that table, it was pretty funny!  As for the 'dead spots', I would change things around on the tables, moving items to new places, every two to three days.  You would not believe how many people commented 'Oh, you just put those out! I didn't see them yesterday!'  It was useless to tell them that no, they were sitting there since day 1 but were in the dead spot. 
 
It's some sort of psychological phenomenon or something, a person's eyes/attention does a formatted scan of items for sale.  You have to break that formatting.