Soft Sculpture And Stuffies

A site to talk about my soft sculpture and stuffed toy creations, paper doll artwork and tarot card art in progress. All are creative endeavors for selling at Medieval events.

Name:
Location: Milwaukee, Wisconsin, United States

I'm a science fiction fan from wayback, artist, soft sculpture toy designer and cat owner.

Monday, February 29, 2016

Doctor Who

 
Dr. Who – love the show!   JoAnn Fabrics started carrying several prints recently and I found two compatible ones to use for making one of my ‘Books For Cats’.   This time around though I had to up the size, usually I cut two layers of fabric at 6 x 5 inches and the folded book is a nice small size, but the print with the Tardis that I want on the cover has images too large to use that way.  Here’s the print I wanted on the outside –
Image result for Dr Who fabric

The Tardis is a little over 2 inches tall.  Trying to stay with the other format would have partial Tardis’s showing up on the cover, so I had to increase the book size. 
 
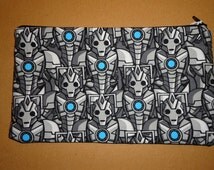
For the inside I had two choices, either Daleks or Cybermen.  The Dalek print was all in browns on white which didn’t match well with the space/Tardis colors.  The Cybermen came in black and grey with a blue energy unit on their chest so I went with those.  Here’s the image (for some reason it's spacing weird on the site today) – 
    
 
Both are high thread count cotton and will stand up to cat claws.   I didn’t use any of the flannel prints they had available. 
 
They look simple enough but each ‘book’ requires seven passes through the sewing machine *sigh*.  Once at the top to join the inner/outer fabrics right sides together. One pass each for the wording to be sewn down (and threads clipped). Once to sew around two of the remaining three sides. You then turn everything right side out.  Fill the inside with loose catnip but not to a bulging state, just a few tablespoons worth.  It has to lay flat when the book is closed.  One more pass to close the open end (without catching on the catnip inside).  Then you shake the catnip around till it’s divided roughly evenly on both sides, fold the ‘book’ closed and sew down the back to make the book binding, again without sewing through any catnip stems inside. 
 
Very simple.  Many, many passes through the sewing machine.
 
Basically it took 2 hours to do the first four passes on 25 books so the process is not quick.  To make the 25 I used every bit of the fabric – 1 yard of the Tardis print and 1 yard of the Cybermen print. Both were layered together so I could just cut and sew without having to match up pieces.
 
As for the text/words – I use my Word program and typed out phrases such as:
Hello! I’m The Doctor
Run You Clever Boy
Bow Ties Are Cool!  Fez’s Are Cool!
Reverse The Polarity Of The Neutron Flow
Hand Me My Sonic Screwdriver
 
I did those in 16 font, printed enough out to have two lines of text for each book, ‘fake’ laminated both sides with clear contact paper since any time printer ink gets wet it blurs way, and then cut out each phrase and just sewed it down in two places over the Cybermen print.  No title on the outside this time.  In the past I’ve used organza ribbon, the see through kind, sewn down and the words slipped under it, but with the lamination I just dropped the ribbon step completely. My needle didn’t have any difficulty attaching the strips of paper firmly.

Sunday, February 07, 2016

Update - Luna Moths

Ok, I tried making two.  The green micro fleece top and felt bottom ended up too flimsy for the wings - I went with two layers of felt instead on the next try.  The furry body worked fine but the 6mm eyes were too small to see and got lost in the fuzziness of the body so I had to switch to an 8mm size.  The antenna idea worked out great!  And it actually made the whole thing very distinctive to look at.  However the small markings in tan on the top wings and the circles on the bottom wings that I did with the first two were........irritating.  I left them off the modified version.
 
So I simplified. 

Forget the micro fleece, I used two layers of felt for the wings, sewn around the edges and trimmed. The top wings were one piece and I made them a tad smaller which looked more balanced, the bottom wings were all one piece as well - and when each pair was done I machine sewed them together right where the body would cover it on top.   Just one line of stitching down and reverse to back the line out again. This leaves the wings separate on each side of where the body gets attached, and yes I did go with the slightly bent down shape in the second picture (from the previous post).
 
The antenna was made of 3" of silk cord.  It looked too simple by itself as is, so I used a needle to pick open the threads at the ends to 'fray out' the whole top inch.  Rat tail cording is built around a piece of string, and that got trimmed out as I went which leaves the silk fray area looking nice and bushy.  I then folded the cord in half and machine sewed the bent end to the top seam when I did the line to attach the wings together.  This avoids me having to hand stitch it on.
 
The body was simply a rectangle 3" by 2", I hand sewed a running stitch around the edges, slightly pulled the stitches tight, stuffed it with fiberfill (and catnip for the cat toys) then pulled it completely closed. This gives an elongated ball shape.  I then tacked it down to the top of the wings, shaped it a tad with my fingers as I went, making sure that the top by the head covered where the antenna attached, and added the eyes as the last step.
 
Honestly the LONGEST part of any of this was the fraying of the antenna.  I sat for three hours at the local Stitch & Bitch meeting and frayed and cut - got around 35 sets done in that time.  The rest of the cutting/sewing/attaching took a fraction of that!  
 
They make nice bright colorful cat toys. They also make nice pins for decorating costumes or putting onto window drapes or for hanging.  I was surprised how something so simple can look so nice!  It turned out great.